Eror Generic host proces for Win32 Services

Sering kali ketika kita menggunakan modem 3.5 G mengalami "Eror Generic host proces for Win32 Services".dengan Reporting details This error report includes information regarding the condition of Gneric Host Process for win 32...tung tung tung (halah..yo poko'e yo ngono kui).
Ketika di layar kita tampil error seperti itu,langsung aja klik close,terus kemudian PC anda minta restart.ketika proses restart,ketik aja huruf C - A - P - E - K - D - E - C -H. Kalo sudah, itu berarti anda telah tertipu (hahahahaha...).wes ah..guuyon wae..
Kalo terjadi eror seperti itu, lakukan langkah-langkah seperti berikut :
Menutup Port 445:

1. Start Registry Editor (Regedit.exe) dengan meng-klik Start menu, kemudian klik Run.
2. Pada kotak kecil yang terbuka, ketik: regedit kemudian klik OK. Registry Editor sekarang terbuka.
3. Carilah registry berikut:
HKEY_LOCAL_MACHINE\System\CurrentControlSet\Servic es\NetBT\Parameters
Di bagian kanan window carilah opsi yg bernama TransportBindName.
Dobel klik angka tersebut, kemudian delete default value, sehingga menjadi kosong (blank value).

Menutup Port 135:

1. Kemudian Anda harus mencari kunci berikut:
HKEY_LOCAL_MACHINE\Software\Microsoft\OLE
2. Anda akan melihat sebuah String Value yang bernama: EnableDCOM
Set-lah value ke: N (biasanya tertulis Y)
3. Tutuplah Registry Editor. Restart-lah komputer Anda.

Nah, cara di atas kadang belum cukup. karena cara diatas bakalan menutup akses folder sharing. Untuk mengatasinya, lakukan langkah-langkah sebagai berikut :

  1. masuk cmd ketik netsh (enter)
  2. winsock (enter)
  3. reset (enter)
  4. exit (enter)
  5. exit (enter)
*Ato download dan instal aja di Klik

Kalau masih tetep eror, copotin semua hardware PC anda, ambil Ram nya, terus berikan ke saya. soalnya PC saya kurang ram nya.ckckckck...(becandaaa...buat nambahin tulisan aja.biar kayak tutorial beneran gitu :p ). Kalo berhasil, gak nolak di kasih cendol gaan.. :D

How to reset password on any windows !

Lets see,how to reset password on windows7/xp
Lets start...

The method uses an open source program called Offline NT Password & Registry Editor. We can use a USB Disk Drive (Pen Drive) or burn a bootable CD for this method.

Follow the Steps below:


Step 1: Download the cd080802.zip file from the link below and extract it. It contains an ISO file.

Step 2: Burn the ISO file to a CD. If you are using a USB drive, then mount the cd080802.iso file to a virtual drive. Open the Virtual Drive and Copy all the contents to your USB disk. If any error comes while copying just skip the file. Now to make theUSB Drive Bootable open a Command Prompt(Press Start + R, Type cmd and enter) and type the following commands:

Here is my drive letter, you should enter your own drive letter.
Step 3: Now start the System which you want to reset the password by putting the CD or the USB in the Computer. While start up you have to make sure that it boots up from the correct device i.e. from the CD or the USB. In order to do this go to your BIOS settings and change the boot order as CD or theUSB drive as the first option. Or if you know the Boot menu key then press it and Boot from the correct device.

Note: Step 4 to Step 8 takes a very less amount of time. No need to worry!

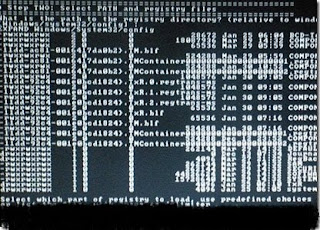
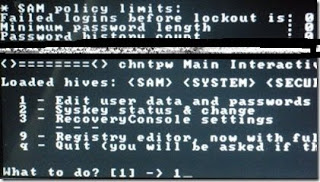
Step 4: After booting from the CD or the USB, press enter to continue the boot process. In the first step it will automatically select the disk where your windows is installed. Simply press enter to continue. In the Second Step it Will select the path and registry files. Select 1 for password reset (It will select 1 by default, just enter) Step 5: Now after selecting the paths, It will ask “What to do?” Simply press enter as it will automatically select 1 for Edit User Password.
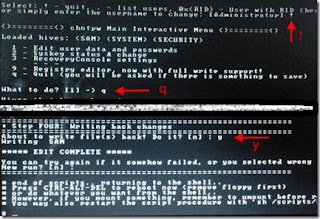
Ok,than "Step6" : It will show a list your system usernames and their password status. Now enter the username whose password you want to reset. It is case sensitive so, be careful and type what you see in the users list. (If the user is Administrator just press enter as it has already selected Administrator by default otherwise enter the correct username)Step 7: It will show you User Edit Menu. Select 1 to clear the user password.
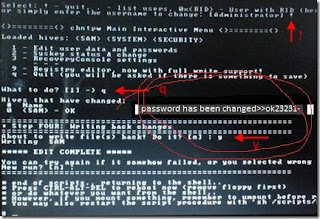
Step 8: It will clear the password. Now Enter “!” to quit from the User select menu. It will again ask “What to do?”. enter “q” to quit. Now in step four it will ask you to write the files or not. Enter “y” to write the files. It will write the files back. Now Simply press enter when it asks for “New run?” as it has selected no by default. Thepassword reset has been successfully completed. Press the power buttonNow start the computer and you will find that it is not asking for password for the user you had selected. That’s it, you are done.! Good Luck..

The List Of Tweaks Part 3

Getting Rid of Unread Email Messages

To remove the Unread Email message by user's login names:

Start Regedit
For a single user: Go to :
HKEY_CURRENT_USER\Software\Microsoft\Windows\CurrentVersion\UnreadMail

For all users: Go to :
HKEY_LOCAL_MACHINESOFTWARE\Microsoft\Windows\CurrentVersion\UnreadMail

Create a DWORD key called MessageExpiryDays
Give it a value of 0


Decreasing Boot Time

Microsoft has made available a program to analyze and decrease the time it takes to boot to WindowsXP
The program is called BootVis

Uncompress the file.
Run BOOTVIS.EXE
For a starting point, run Trace / Next Boot + Driver Delays
This will reboot your computer and provide a benchmark
After the reboot, BootVis will take a minute or two to show graphs of your system startup.
Note how much time it takes for your system to load (click on the red vertical line)
Then run Trace / Optimize System
Re-Run the Next Boot + Drive Delays
Note how much the time has decreased
Mine went from approximately 33 to 25 seconds.

Increasing Graphics Performance

By default, WindowsXP turns on a lot of shadows, fades, slides etc to menu items.
Most simply slow down their display.

To turn these off selectively:

Right click on the My Computer icon
Select Properties
Click on the Advanced tab
Under Performance, click on the Settings button
To turn them all of, select Adjust for best performance
My preference is to leave them all off except for Show shadows under mouse pointer and Show window contents while dragging

Increasing System Performance

If you have 512 megs or more of memory, you can increase system performance
by having the core system kept in memory.

Start Regedit
Go to :
HKEY_LOCAL_MACHINES\YSTEM\CurrentControlSet\ControlSessionManagerMemoryManagementDisablePagingExecutive

Set the value to be 1
Reboot the computer


Increasing File System Caching

To increase the amount of memory Windows will locked for I/O operations:

Start Regedit
Go to :
HKEY_LOCAL_MACHINESYSTEMCurrentControlSetControlSessionManagerMemoryManagement

Edit the key IoPageLockLimit


Resolving Inability to Add or Remove Programs

If a particular user cannot add or remove programs, there might be a simple registry edit neeed.

Go to :
HKCUSoftwareMicrosoftWindowsCurrentVersionPolicies Uninstall

Change the DWORD NoAddRemovePrograms to 0 disable it

4096 - 32megs of memory or less
8192 - 32+ megs of memory
16384 - 64+ megs of memory
32768 - 128+ megs of memory
65536 - 256+ megs of memory

Connecting To Telnet

Now i just used stranded CMD telnet for this tutorial.
Open up CMD and type in "telnet" without the quotesNow that will just open up the telnet terminal.

O IP Port
Example
o 127.0.0.1 22
Now O basically stands for Open to Then you would type in the IP. Now when your using the telnet terminal if your connecting to a computer on port 23 you dont have to type anything for the port. Due to port 23 being automatic with telnet terminal.
Now say you wanted to connect to another port you would just type that in after the IP
127.0.0.1 port

After you've entered the IP you want to connect to + the port just press enter, and if computer has password and username set then you will have to login.
Now if your connecting via telnet/ftp for malicious purposes, unless you can guess the name you are either going to have to bruteforce it or use a word list
I would suggest using THC-Hydra linux has a GUI version but i will later on be making a tutorial with the command line windows version.

So enter in the login info and if you got it right, you will have as much access as the account you login is with is granted.Now keep in mind 99% of people that have telnet open use logging
So either bounce your connection off an owned box or use a VPN before you connect.

Uninstalling Windows from Command Prompt

One option included in Windows XP is the ability to uninstall XP if you performed an upgrade from Windows 98, 98SE, or Windows Me.
The standard method of removing XP is achieved by booting into XP normally and uses the Add/Remove Programs tool in Control Panel.
If you are unable to start XP normally, the second option is to load XP in Safe Mode then use the same tool.
If you are unable to boot normally or boot into Safe Mode, XP can be removed by uninstalling from a Command Prompt.
The procedure is as follows:

Important Note: This procedure is available only if a successful image of the previous operating system was created during the XP upgrade.

Start the computer to Safe Mode with Command Prompt.

At the command prompt, type cd\, and then press ENTER.

Type cd\windows\system32, and then press ENTER.

Type osuninst.exe, and then press ENTER.

On screen instructions will guide you through the uninstall process to revert to the previous operating system.

This procedure can only be performed by users logged on as Administrator or a user with administrative rights.

The List Of Tweaks Part 2

NOTEPAD "world trade centre trick".......

Did you know that the flight number of the plane that had hit WTC ...on
9/11 was Q33N ....Open your Notepad in ur computer and type the flight
number i.e Q33N... Increase the Font Size to 72, Change the Font to
Wingdings. U will be amazed by the findings.

log trick !! make ur Notepad a diary !!

Sometimes we want to insert current data and time, whenever we open the file in the notepad. If you are a lazy person like me, who don’t like to press F5 whenever you open a notepad. Then here is a trick to avoid this. Just add a .LOG in the first line of your text file and close it.
Whenever you open the file with that text in the first line in the notepad, it will insert the current date and time at the end of the file. You can start entering your text after that.
WHY?
The reason this happens:
In notepad, any other 4-3-3-5 letter word combo will have the same results.
It is all to do with a limitation in Windows. Text files containing Unicode UTF-16-encoded Unicode are supposed to start with a "Byte-Order Mark" (BOM), which is a two-byte flag that tells a reader how the following UTF-16 data is encoded.

1) You are saving to 8-bit Extended ASCII (Look at the Save As / Encoding format)
2) You are reading from 16-bit UNICODE (You guessed it, look at the Save As / Encoding format)
This is why the 18 8-bit characters are being displayed as 9 (obviously not supported by your codepage) 16-bit UNICODE characters

SPEED UP MENU DISPLAY.!!

When using the start menu the you will notice a delay between different tiers of the menu hierarchy. For the fastest computer experience possible I recommend changing this value to zero. This will allow the different tiers to appear instantly.
Start Regedit. If you are unfamiliar with regedit please refer to our FAQ on how to get started.
Navigate to HKEY_CURRENT_USER\Control Panel\Desktop
Select MenuShowDelay from the list on the right.
Right on it and select Modify.
Change the value to 0.
Reboot your computer.

CLICKING * .AVI FILES ON EXPLORER CAUSING 100% CPU USAGE.!!

Well windows seem to have a REALLY big problem when it comes to reading AVI files. It seems that when you click on an AVI file in explorer, it'll try to read the entire AVI file to determine the width,height, etc. of the AVI file (this is displayed in the Properties window). Now the problem with Windows is that if you have a broken/not fully downloaded AVI file that doesnt contain this info, Windows will scan the entire AVI file trying to figure out all these properties which in the process will probably cause 100% CPU usage and heavy memory usage. To solve this problem all you have to do is the following:
1. Open up regedit
2. Goto HKEY_CLASSES_ROOT\SystemFileAssociations\.avi\shellex\PropertyHandler
3. Delete the "Default" value which should be "{87D62D94-71B3-4b9a-9489-5FE6850DC73E}"
Voila! Please not that this will no longer provide you with the windows properties displaying the AVI file information such as width, height, bitrate etc. But its a small price to pay for saving you resources.
NOTE: Please use caution when using regedit. Improper usage may cause windows to behave imcorrectly. Also, I cannot be held resposible. Backup your registry first.

CD ROM STOPS AUTOPLAYING/AUTORUN.!!

And the AutoPlay Tab has disappeared in My Computer, Devices With Removable Storage, Right Click on CDROM, Properties.
Solution: The service: "Shell Hardware Detection" has been set to Manual or Disabled. Go to Control Panel, Administrative Tools, Services. Return this service to "Automatic".

How to make your Desktop Icons Transparent

Go to Control Panel > System, > Advanced > Performance area > Settings button Visual Effects tab "Use drop shadows for icon labels on the Desktop"

DISPLAY MESSAGE ON STARTUP.

Start regedit, if you are unfamiliar with regedit please see our FAQ.
Navigate to HKEY_LOCAL_MACHINE\SOFTWARE\Microsoft\Windows NT\CurrentVersion\Winlogon
Modify the key legalnoticecaption with what you want to name the window.
Modify the key legalnoticetext with what you want the window to say. Restart

AUTO DELETE TEMPORARY FOLDER.!!

ll what i prefer is %temp% " without quotes.. at Start -> Run..
this opens ur temp folder n den u cal erase it neatly// still try dis one too..
First go into gpedit.msc
Next select -> Computer Configuration/Administrative Templates/Windows Components/Terminal Services/Temporary Folder
Then right click "Do Not Delete Temp Folder Upon Exit"
Go to properties and hit disable. Now next time Windows puts a temp file in that folder it will automatically delete it when its done! Note from Forum Admin: Remember, GPEDIT (Group Policy Editor) is only available in XP Pro.

Make ur pdf files to speak

here r the shortcuts for hearing pdf files in abobe reader 6.0 or higher
ctrl+shift+b ---->to hear the whole topic
ctrl+shift+v ---->to hear the page

The List Of Tweaks Part 1

Set Processes Priority

Follow this tip to increase the priority of active processes, this will result in prioritisation of processes using the CPU.
CTRL-SHIFT-ESC
1.Go to the second tab called Processes, right click on one of the active processes, you will see the Set Priority option
2.For example, your Run your CDwriter program , set the priority higher, and guess what, no crashed CD’s
Shutdown Trick !

Imidiate rapid shut down window
while shutting down window. open task manager(Ctr+Alt+Del),
Select shut down tab. and press ' Ctrl ' key while select Turn Off from dis tab.
Count 5 4 3 2 1 Voila!!! U r window will rapidly shut down.


Speed Up Ur Shut down !!
Start Regedit.
Navigate to HKEY_LOCAL_MACHINE/SYSTEM/CurrentControlSet/Control.
Click on the "Control" Folder.
Select "WaitToKillServiceTimeout"
Right click on it and select Modify.
Set it a value lower than 2000 (Mine is set to 200).
and !
Like previous versions of windows, it takes long time to restart or shutdown windows xp when the "Exit Windows" sound is enabled. to solve this problem you
must disable this useless sound. click start button then go to settings -> control panel -> Sound,Speech and Audio devices -> Sounds and Audio Devices -> Sounds, then under program events and windows menu click on "Exit Windows" sub-menu and highlight it.now from sounds you can select,choose "none" and then click apply and ok. now you can see some improvements when shutting down your system.

Hide Your folders.. never known trick !!!!!!!!!! Disguise them to "Recycle Bin"

Rename any folder with extension {645FF040-5081-101B-9F08-00AA002F954E}
eg,
if u've a folder games
press F2,
then type, "games.{645FF040-5081-101B-9F08-00AA002F954E}"
c the magic....
then 2 get to original form,
remove the extension using
"ren games.{645FF040-5081-101B-9F08-00AA002F954E} games" in dos or as a bat file
n u are done..

System information

system up time only for xp professional edition
It boasts how long it can stay up. Whereas previous
versions of Windows were coy about how long they went
between boots, XP is positively proud of its stamina.
Go to the Command Prompt in the Accessories menu from
the All Programs start button option, and then type
'systeminfo'. The computer will produce a lot of
useful info, including the uptime. If you want to keep
these, type 'systeminfo > info.txt'. This creates a
file called info.txt you can look at later with
Notepad. (Professional Edition only).

Lock pc just by double clicking mouse

You can lock your XP workstation with two clicks of
the mouse. Create a new shortcut on your desktop using
a right mouse click, and enter 'rundll32.exe
user32.dll,LockWorkStation' in the location field.
Give the shortcut a name you like. That's it -- just
double click on it and your computer will be locked.
And if that's not easy enough, Windows key + L will do
the same.

SPEED UP UR ACROBAT READER (ALMOST LIKE NOTEPAD)

Do u get irritated when acrobat reader takes 5/10 seconds to load when you want to open a pdf document. There is a way to speed up the loading.
1. Go to the installation folder of acrobat reader
(C:\program files\adobe\acrobat\reader\.. whatever)
2. Move all the files and folders from the "plugins" directory to the "Optional" directory. (I repeat.. cut and paste the files NOT copy & paste).
Also make sure that acrobat reader is not open else it will lock the files and not allow you to move the files).
Now your acrobat reader will load very fast
and almost as good as notepad..

Remove Stored username and Passwords !

To remove the Stored User Names and Passwords from your system, try this:
Click Start, Run and type Control keymgr.dll
Remove the entries from the list.
The other ways to access this dialog are:
Type Control Userpasswords2 in RUN box, click Advanced, Manage Passwords
-or-
From Control Panel, select your User Account, click Manage your network passwords
It Works.........

Remove the Username and picture from Windows XP New Start Menu
The User account picture can be removed by turning off the Welcome Screen. Or, by switching to Windows Classic theme. Follow the method described in this article if you want to remove the username and picture from the Start Menu, without disabling the Welcome Screen and Windows XP Theme.
For those who want to remove the user name and user account picture from Start Menu, in order to have a blank blue panel at the top, try this:
Start Windows Explorer and go to this folder:

C:\Documents and Settings\All Users\Application Data\Microsoft\User Account Pictures
From that folder, rename the BMP file which corresponds to your user account.
( For example, if your username is Robert, rename Robert.bmp to old_Robert.bmp )
Next, rename the following folder:

C:\Documents and Settings\All Users\Application Data\Microsoft\User Account Pictures\Default Pictures

to something else, say...

C:\Documents and Settings\All Users\Application Data\Microsoft\User Account Pictures\No_Default Pictures
To remove the user name, follow these steps
Start regedit.exe and navigate to the this key:
HKEY_CURRENT_USER \ Software \ Microsoft\ Windows \ CurrentVersion \ Policies \ Explorer
In the right-pane, set NoUserNameInStartMenu value-data to 1
Close Regedit.exe and restart Windows.
You'll end up with a blue space at the top of the Start Menu.
To get back the username and the picture, reverse the above procedure.
For the New Start Menu, Windows XP looks for the .bmp file in the folder
C:\Documents and Settings\All Users\Application Data\Microsoft\User Account Pictures
If the file is not found, it takes a picture from the "Default Pictures" sub-folder. By renaming the .bmp and the "Default Pictures" folder, you're giving no chance for Windows to fetch an image for the Start Menu

Notepad Trick ! for complete list move to NOTEPAD TRICKS page !!

Well quite old but here is d complete collection

Step 1: Open Notepad
Step 2: Write following line in the notepad.
this app can break
Step 3: Save this file as xxx.txt
Step 4: Close the notepad.
Step 5: Open the file again.
Voilla!!
or
1> Open Notepad
2> Enter four words separated by spaces, wherein the first word has 4 letters, the next two have three letters, and the last word has five letters
3> DON'T hit enter at the end of the line.
4> Save the file.
5> Close Notepad.
6> Reopen Notepad.
7> Open the file you just saved.
or
Open a note pad
type Bush hid the facts
save that file,
close it
again open and see...

get more then 100, 000 views on YouTube

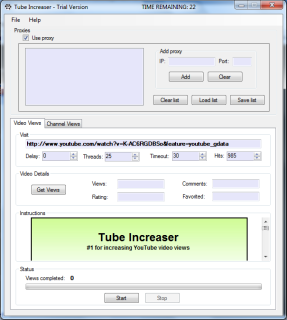
In this tutorial I will teach you & show you how to get more then 100k views on YouTube. Its totally free & simple... All you need is little time, good internet connection & proxy list.

Get TubeIncreaser & install it

STEP 1

NOTE: Depends on internet speed, well I get around 200k views per day because my net is good.

For this step, we need to download one tool called YouTube Increaser 3.0. Well, it's not free but I will show you how to get free for ever version. You don't need any cracks, keygens or stuff like that, I will soon show you one trick. Tongue

You download it from official page, so its 100% clean and virus free! So you don't need to worry is it clean or virus. Non
How to bypass limit
STEP 2

Now when you install it and run it you can use it 30 times. Well, now I will show you how to bypass that limit & get free full version of it. Lets start. Smile

Follow this steps:

Click Start > then click Run... > Type in Regedit and click OK.

Now, we will need to edit registry folder of our Tube Increaser 3.0.

HKEY_CURRENT_USER > Software > TurboTube > choose TubeIncreaser > and delete turbo
Setup proxy & start increasing
STEP 3

Now we need proxy, because if we use our own IP we will get around 5 views only per day, because YouTube got some limit. Smile

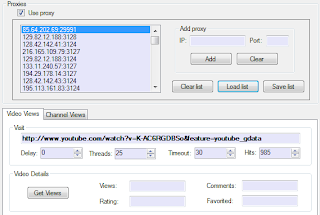
Go here and download proxy list, save it in notepad and name it Proxy.txt.
Click here to download Proxy list!
When you save it on desktop, go to TubeIncreaser 3.0 and click Load List and choose list. In YouTube URL bar, write your Video URL/link, from Hits box write numbers of views and click button Start.
Well that was all, really easy and simple. Good Luck

How u can detect viruses in your pc (simple tutorial)


easy way to check our computer is infected with a virus or not.
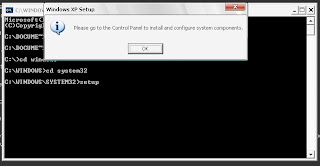
  1. go to start-run-command
  2. write cd.. (notice the tow dots) and press enter write cd.. (again) and press enter
  3. write (cd windows) and press enter
  4. write (cd system32) and press enter
  5. write (setup) and enter
If you get that message

(Please switch to the control panel to install components and systems composition)

Then that means your pc is clean.

The idea here is the (setup)file which is located within (system32)is shut down when your pc infected and open when your pc is not infected because most viruses shut down all system.exe extensions.


I've tried it and it worked!


Computer locks up and won't boot?


Your computer locks up, crashes, stalls or otherwise fails to completely boot up into Windows. That's particularly painful, since most all of our diagnostic tools require that Windows be running. Diagnosing the problem with a computer that won't boot can be difficult.let's start:
  • Loading User Settings
One of the last steps that Windows takes before being ready for use is to load the personal settings for the user logging in. That includes settings within the Windows Registry, saved network connections, and the security settings for the account. This step exercises a lot of different areas on the machine, so if it hangs, or is exceptionally slow here, it could be for many reasons. Things to check include disk space and fragmentation, physical errors on the disk holding the swap file, and network connectivity that might impact restoring those saved connections. In particular, in a Domain based environment, network connectivity can be a particular problem as the system tries to contact the domain controller. (Domains are common in business settings as opposed to a Workgroup, more common in small business and home).
  • Blue Screens and Other Hangs

A "Blue Screen" is the name given to the blue screen of strange numbers and information that can sometimes come up if your machine crashes. Essentially any blue screen, hang, crash or lock-up that happens after the Windows logo is displayed falls into this category. If that happens repeatedly during boot, it could be anything from a bad device driver to spyware to a virus.

The best first step to take is to attempt to boot in what's called "Safe Mode". Safe mode disables a number of operating system components, possibly avoiding the component that might be causing the problem. Once in safe mode you can try running the system file checker, your anti-virus software, anti-spyware software, and possibly get Windows updates.If Safe Mode itself won't work, the next step back is something called the Recover Console.

  • Hangs before the Windows Logo

If you can't actually get anything to come up - by that I mean that you never even see the initial Windows logo, you can run the Recovery Console from your Windows XP Installation CD.

Regardless of how you got there, the recovery console will allow you to copy files, undo a recent installation, or fix the master boot record should that have become corrupt.

  • Operating System? What Operating System?

One of the scarier messages is "Operating System Not Found". It implies that the operating system on your hard disk isn't there any more. First, remove any floppy from the machine. It's a common error - when you reboot, the computer will try to boot from it, not find an operating system and halt. Assuming that wasn't the problem, get out and boot from your Windows XP Installation CD.

  • Hard Disk? What Hard Disk?

Things start to get a little scarier when your computer doesn't appear to even have a hard disk. When software like the Recovery Console doesn't even see that you have a hard disk in your machine, things get interesting.

The most common cause of this in a previously working machine is that the CMOS memory, which keeps your hardware and BIOS configuration settings, has lost its contents. That can happen due to anything from a power spike to errant software - but the most common cause on older machines is that the little battery that keeps the CMOS alive has worn out. The type and location will vary from machine to machine.

CMOS settings on some machines are what tell the computer what kind of hard disk you have. You'll probably want to review the settings in your BIOS to make sure they are correct. Typically most brand name computers include a print-out of their CMOS settings when they come new, or their technical support resources may be able to help. A misconfiguration can "look like" a hard disk to the BIOS, but in fact be wrong.

And, of course, there is the possibility of hardware failure of the drive itself. If that's what you suspect, it's probably time to touch base with the manufacturer or a local repair technician.

  • BIOS & POST

If your computer doesn't even get so far as to try the hard disk, or perhaps not even print anything on the screen, you probably do have some type of hardware problem. For example, if the computer simply beeps a few times and then does nothing, then that's the POST telling you something is wrong. For what ever reason it might not be able to display an error message, so it simply beeps in a pattern to tell you what it's found. They vary based on the brand of your computer or BIOS, but POST beep codes can often give a technician a quick idea of exactly what might be wrong.

And finally, when you turn on the power, if your computer does nothing at all, obviously something is seriously wrong. In my experience, it's typically the power supply that has failed, however it's also possible that critical components on the motherboard have failed, or that a peripheral card has been inserted improperly or has failed in such a way as to prevent the rest of the system from working at all.

Hide Blog Title, Description.

Your blog title and description is very important for search optimization. Search engines when indexing your blog use the title and description tags. Hence these are indispensable fields.


However sometimes you may require to hide your Blog Title and description. The new option to upload images to Blogger Header gives you one option to do this while uploading an image to your header. If you are adding a picture to the background of the header then you do not have this option. Here is another method.........

HIDE BLOG TITLE

To do this login at Blogger.com and click on Layouts link on Dashboard. Then click on Edit Html subtab of Template tab. First backup your template. Then scroll down to this code :


#header h1 {
margin:5px 5px 0;
padding:15px 20px .25em;
line-height:1.2em;
text-transform:uppercase;
letter-spacing:.2em;
font: normal normal 200% Georgia, Serif;
display:none; /*<---Insert this line*/ }


Insert the "display:none;" line in the code for the header as shown above. Click Preview button to see the effect. Save Template. Clear Cache. View Blog.

HIDE BLOG DESCRIPTION

To hide the blog description scroll down to this code in the blog template :


#header .description {
margin:0 5px 5px;
padding:0 20px 15px;
max-width:700px;
text-transform:uppercase;
letter-spacing:.2em;
line-height: 1.4em;
font: normal normal 78% 'Trebuchet MS', Trebuchet, Arial, Verdana, Sans-serif;
color: #999999;
display:none; /*<---Insert this line*/ }


Insert the "display:none;" line in the code for the header as shown above. Click Preview button to see the effect. Save Template. Clear Cache. View Blog.

Enjoy!

Free Internet On MTN Nigeria With Your Freeedom

First Lets Start with the requirments:
1. You Need an MTN line with 0 naira credit in it.
2. You need a phone that can be used as a modem to connect your computer to the internet. Such as Nokia phones with Nokia PC suite software or Motorola Phones with M Phone tools software.
3. You Need a Computer of Laptop
4. You need to register on hxxp: www. your-freedom. net/?referer=690386 and get your username and password to use the software. (REGISTRATION IS FREE)
5. Download Your Freedom from here: hxxp: www. your-freedom. net/index. php?id=3&referer=690386
6. Download OPEN VPN from here

NOW LETS START SETTING UP YOUR COMPUTER FOR FREE 24 HOUR A DAY BROWSING!!
1. Download and install Open VPN.
Next, click on start, control panel, network connection.
Right click the network connection that has TAP-Win32 Adapter V8 driver, then click on properties. Scroll down then click on Internet Protocol (TCP/IP), then click on properties.

CLICK ON OBTAIN AN IP ADDRESS AUTOMATICALLY and
OBTAIN DNS SERVER ADDRESS AUTOMATICALLY

Then Click on OK and double click the connection to enable it. It will say a network cable is unplugged for now.
2. Dowload and Install Your-Freedom and enter these settings.
Let me just explain everything step by step. Open Your-Freedom
-Click on the status tab. Then clicked on configure.
- On the server connection tab. Use these settings:
Address: ems07. your-freedom. de
Port: 53
Connection Mode: UDP
Next Click on Account Information and enter the username and password you received when you registered on hxxp: www. your-freedom. net/?referer=690386
Next Click on Proxy Settings Tab and enter these settings.
Proxy Address: 10. 199. 212. 8
Proxy Port: 8080
Proxy Username: web
Proxy Password: web
Proxy Domain: (leave this blank)
Proxy Type: HTTP/HTTPS
Proxy Authentication: Any or none
User Agent: (leave this blank)
FTP Proxy Server: (leave this blank)
Proxy Address (leave this blank)
Proxy Port:(leave this blank)
Now click on Save and Exit.

Now on the Your-Freedom Menu. Click on ports and select OPEN VPN.
Start your MTN connection to your PC. Then go to Your freedom again and Click on the status tab again and this time click on Start Connection. (Keep clicking on start connection till it connects, even if the connection fails)
Minimize the Your Freedom Windows and open Your web browser and start browsing.
Enjoy!

If it still does not connect or if it connects and you can not browse, open the Your Freedom window and click on the Ports tab and un check the OPEN VPN box. Then go to your browser and find the manual proxy configuration settings(proxy servers), probably under network settings, and enter this IP for all Proxies: 127. 0. 0. 1 and enter this port for all ports: 8080

Thanks to my friend utotomi for sharing this information that am given you also.
Then Note: The settings above for Your freedom on MTN only enables you as free users to browse for just 6hours, I believe you all know this by now.
Presently I am no longer a free user because of am tired of the every 1hour disconnections which disturbs my web browsing, downloading and watch of tv online. I am on Basic Plan, you can purchase each plan on freedom website but if you still dont know how or cant do it yourself here is my blog Free tutorial and download software or watch free tv world its has everything to get you started just pick whichever package you plan of paying for and I will do the rest.

tIPS Add 3 Coloumn Footer in Your Blog

how about make some Blogger hack in our template? Like adding 3 coloumn in footer?i see, you all agree about it. let’s begin.
  • Log in your blogger account
  • Move to Layout and Choose Edit HTML
  • Back up your blog first, and click on expand widget template
  • Copy this code and paste before the tag </b:skin>

#footer-column-container {
clear:both;


}


.footer-column {


padding: 10px;


}
  • save the template
  • Now, find this code
<div id='footer-wrapper'>


<b:section class='footer' id='footer'/>


</div>


  • Change the red code with code below
<div id='footer-column-container'>


<div id='footer2' style='width: 30%; float: left; margin:0; text-align: left;'>


<b:section class='footer-column' id='col1' preferred='yes' style='float:left;'/>


</div>


<div id='footer3' style='width: 40%; float: left; margin:0; text-align: left;'>


<b:section class='footer-column' id='col2' preferred='yes' style='float:left;'/>


</div>


<div id='footer4' style='width: 30%; float: right; margin:0; text-align: left;'>


<b:section class='footer-column' id='col3' preferred='yes' style='float:right;'/>


</div>


<div style='clear:both;'/>


<p>


<hr align='center' color='#5d5d54' width='90%'/></p>


<div id='footer-bottom' style='text-align: center; padding: 10px; text-transform: lowercase;'>


<b:section class='footer' id='col-bottom' preferred='yes'>


<b:widget id='Text2' locked='false' title='' type='Text'/>


</b:section>


</div>


<div style='clear:both;'/>


</div>

  • Save and done
Now you can check your Layout, if you follow the instruction you will see three footer have added.Good Luck.

Tips Get Error Messages On Template Editor

Your template could not be parsed as it is not well-formed. Please make sure all XML elements are closed properly.,,bla,,,bla

I’m sure that you exactly know about type of message above. It usually appears when we get the wrong way while pasting a HTML into your template editor. The error message given when you attempt to Preview or save a HTML.

As we know, New Blogger Templates are coded in XHTML which is based on XML. XHTML is a much stricter language than HTML and you will encounter more error messages while working on the new templates.

I will give you some tips to handle this errors. Different errors will be solved by different method too. So, check the type of your error message and find the solving tips in my list tips below:

- WHEN THERE IS NO MATCHING END TAG : In XHTML every tag should have a matching end tag. If there is a end tag missing you will get the following error message :

Your template could not be parsed as it is not well-formed. Please make sure all XML elements are closed properly.
XML error message: The element type "div" must be terminated by the matching end-tag "

Matching end tags are </div> for <div>.

All tags should be closed using a forward slash. If there are empty tags then they should be closed by putting a space before the forward slash. For example : <br />.


- SAME WIDGET ID ERROR : If you add a widget or Page Element with the same ID Number as a widget already present in the template you will get the following error :

More than one widget was found with id: archive1. Widget IDs should be unique.

To correct the error just change the number in the widget ID. In this case change it to archieve1

- ADDING CODE BEFORE THE INCLUDABLE : If you add a line of code before the includable line in an expanded widget template you will get the following error :

The widget with id "Blog1" cannot contain element: "b:if". A widget can only contain b:includable elements

To prevent this always add any code after this line <b:includable id='main'> in the widget code.

.- USING THE CHARACTER "&". When using ampersand within an attribute value it should always be written using a m p; (without the spaces) and not simply an & character. If this is not done you will get the following error message :

Your template could not be parsed as it is not well-formed. Please make
sure all XML elements are closed properly.
XML error message: The entity name must immediately follow the '&' in
the entity reference.


OR THIS


Your template could not be parsed as it is not well-formed. Please make sure all XML elements are closed properly.
XML error message: The reference to entity "key" must end with the ';' delimiter.

For example this is incorrect: <title>Cats & dogs</title> while this is
correct: <title>Cats &a m p; Dogss</title>. Omit the spaces between a m p. Do this in links also.

- LINK ERROR : Following error is seen :

Your template could not be parsed as it is not well-formed. Please make
sure all XML elements are closed properly.
XML error message: The value of attribute "href" associated with an
element type "a" must not contain the '<' character.

when you have in your template code of this type :

<a href="<data:post.url/>">Link list!</a>

To correct this error change the code to the following :

<a expr:href='data:post.url'>Link list!</a>


Are you still with me friend? That’s all the tips about error message in your template. Just keep in your mind to Backup your template first before you do anything with your template or you will regret it. I hope this tips will help you to solve the errors.

Submit Sitemap of your Blogger Blog to Google


Sitemaps, in simple English, are text files containing a list of all web pages that exist on your site. It is important that you create a comprehensive sitemap as it will help Google and other search engines crawl your site better and that might mean more traffic coming your way in the long run.

The Problem with Blogger Sitemap Files

Ideally, the sitemap file should contain all URL

s of a site but if your blog is hosted on blogspot.com (or if you are using a self-hosted version of Blogger with a custom domain), you’ll be surprised to know that the default sitemap file contains only the 26 most recent pages of your blog.

That’s a bad thing because some of your older blog p

ages, that are missing from the system-generated sitemap file, may never get indexed in search engines. There’s however a simple solution to fix this problem.

Generate a Complete Sitemap for your Blogger Blog

Step 1: If you haven’t done this already, sign-in to

your Google Webmasters account and add your blog.

Step 2: Once your blog is added to Google, open the Sitemap Generator and type the full address of your blogspot blog (or your self-hosted Blogger blog).

Step 3: What you get is list of sitemap files that contain each and every page of your blog. You now just have to ping Google, Yahoo and Bing to inform them about these XML sitemaps.

As shown in the video screencast below, you need to manually add each of the sitemap files into your Google Webmaster Tools dashboard but for Bing or Yahoo, you can simply click blue hyperlinks and these search engines will automatically d

ownload the relevant sitemap files from your blogspot site.

Once all the Sitemaps are added, your Google Dashboard should look something like this.

If you see a red cross or an orange exclamation symbol instead of the green tick, that means something is wrong with your XML sitemap. Verify that the file exists by typing the sitemap URL in your browser. Good luck.

PDF-XChange Pro 4.0180.50.EAT


Windows | Tracker Software PDF-XChange Pro 4.0180.50.EAT | 38 Mb


Allowing both the creation (from Image file formats, Image Scanners/Web CAMS and text files etc) and manipulation of Adobe compatible PDF files, PDF-Tools is an ideal tool to compliment your existing PDF creation application or as a 'stand alone' tool in it's own right! PDF-Tools requires no additional 'plug-ins' or applications such as Adobe Acrobat or Distiller. Also now includes the new PDF-XChange Viewer PRO with a visual means to markup and modify your PDF files!


Functions:
Scan/Import Images from any Twain or WIA device to PDF
Convert Text files to PDF
Batch convert Image file formats to PDF (allows user to mount muliple images vertically/horizontally per page)
Merge and/or Overlay PDF pages and files
Delete or extract Pages from a PDF file
Extract Images and Text from a PDF file to other formats.
Extract formatted text and images to .RTF and .DOC and open in your preferred Word Processor etc for editing/re-formatting
Create & Edit Bookmarks
Create Thumbnails
Add Header/Footer style Watermark text
Re-number pages (i.e. after merging multiple files) - includes intelligent Macro's to automate and overprint in required location of page(s)
Merge (overlay) PDF pages as stationary/forms onto text or another PDF pages - in background or foreground mode.
Send Functions:(Applies to all file types, not simply PDF's)
Email (Via MAPI or SMTP)
FTP - FTP your Files to a Server
HTTP - Post files to a Server
Optimise font embedding in existing PDF files.
Add/Modify Security with both 40/128 Bit & AES encryption supported
Add text or Image based Watermarks to pages or entire files.
+ all the features available in the PDF-XChange Viewer PRO release.
(please note: PDF-XChange Viewer PRO is available for Windows 2000 and later only.)

Download here

Image Converter Plus 7.1.9

ImageConverter Plus is a useful and complex image utility that allows you to preview, edit and convert images. Image Converter Plus consists of shell extension (option added to context menu) and three stand alone applications - Image Converter, Image Editor and Photo Print. Image Converter can convert and apply the same effects to multiple files at a time. It uses the script technology to made conversion easy for everyone. Graphics editor allows viewing and editing graphic files.

Print manager (PhotoPrint) is the best utility for creating and printing large image catalogues. Shell extension allows to view graphic files without opening them in graphics editor, get full information about graphic files, convert, copy to clipboard and print with one mouse click. ImageConverter Plus reads 80+ image file types. Image Converter Plus is the professional converter for graphic files, photos, drafts, finance documents and other images of any type.

Download here

Acronis True Image Home 2009 v12.0.0.9770-IND


Acronis True Image Home 2009 complete PC protection: back up your entire PC, including the OS plus your data, applications, pictures, video, financial documents, settings and everything!
Acronis True Image Home 2009 is an award-winning backup and recovery solution for a good reason: it protects your PC after just one click and allows you to recover from viruses, unstable software downloads, and failed hard drives. Create an exact copy of your PC and restore it from a major failure in minutes, or back up important files and recover them even faster.

Features :

* One-Click™ Protection — All you need to do is assign what to back up, when and where to. Backups occur will be then implemented automatically, or with just one click.
* Try&Decide™ — Trial software or browse the web in a protected, safe environment. You can decide whether to keep or discard changes at the end of a session.
* Protect your applications — Back up all settings for Microsoft Office, iTunes, Media Player and dozens of other most popular applications!
* Restore your PC from an image — Recover what you need, be it your entire system, a critical file, or application settings.

zDownload here

MultiBoot DVD v11.0 Afin | 3.47GB


Multiloading DVD-ROM to work, backup and restoration of the hard disk, the treatment of viruses, reset forgotten passwords, etc. Excellent multizagruzochnik that combines a host of other titles.
Changes from version 10.1: Completely revised and ideology of the disc. As a result, consistent use of 2-downloaders: Bootable CD Wizard v2.0a1 GRAB4DOS and managed to significantly expand the functionality of the drive and realize the download of a large number of LiveCD, based on WindowsPE and Linux (see description). MultiBoot DVD v11.0 includes: Alkid Live CD Windows PE based: Alkid LiveCD Full (04 April 2010) - in full. Alkid LiveCD SE Driver (March 2010) - a special lightweight (stripped-down on the number of programs) version. Alkid LiveCD SE without drivers (March 2010) - a special lightweight (stripped-down on the number of programs) version. Hiren's Boot CD: Hiren's Boot CD 10.4 - en banc (Keyboard otpatchena for the Russian language). - In the boot menu Hiren's Boot CD item was added: Go to WindowsPE LiveCD Menu -> -> -> -> -> From this menu item, switch to the new menu from which you are downloading the following baziruschihsya on WindowsPE and Linux LiveCD: Windows LiveCD: - LiveCD Windows'7 by xalex final 07.04.2010 AntiVirus Rescue Disks: - Kaspersky Rescue Disk v10.0.12.1 01.04.2010 - DrWeb LiveCD 14.04.2010 - Eset NOD32 Rescue Disk 07.04.2010 Active @ Boot Disk Suite: - Active @ Boot Disk Suite v5.0.5 WindowsPE & DOS Software Paragon: - Paragon Hard Disk Manager 2010 Build 9369 Professional - Paragon Partition Manager 10.0.7893 Server Edition Software Acronis: - Acronis Disk Director Server 10.0.2169 RU full & safe - Acronis Disk Director Server 10.0.2288 EN full & safe - Acronis Disk Director Suite 10.0.2288 EN full & safe - Acronis BackUp & Recovery Workstation 10.0.11105 with Universal Restore EN - Acronis TrueImage Home 2010 Build 6053 RU full & safe - Acronis TrueImage Home 2010 Build 7046 EN full Windows Recovery: - Windows 7 Recovery Disk x64 - Windows 7 Recovery Disk x86 - Microsoft Emergency Repair Disk (ERD) Commander v6.5 x64 for Windows 7 / Server 2008 R2 - Microsoft Emergency Repair Disk (ERD) Commander v6.5 x86 for Windows 7 / Server 2008 R2 - Microsoft Emergency Repair Disk (ERD) Commander v6.0 for Windows Vista / Server 2008 Programme WindowsPE LiveCD Menu: - LiveCD Windows'7 by xalex - Kaspersky Rescue Disk 10.0.12.1 01.04.2010 - DrWeb LiveCD 14.04.2010 - Eset NOD32 Rescue Disk 07.04.2010 - Active @ Boot Disk Suite - Software Paragon Paragon Hard Disk Manager 2010 Build 9369 Professional Paragon Partition Manager 10.0.7893 Server Edition - Software Acronis Acronis Disk Director Server 10.0.2169 RU full & safe Acronis Disk Director Server 10.0.2288 EN full & safe Acronis Disk Director Suite 10.0.2288 EN full & safe Acronis BackUp & Recovery Workstation 10.0.11105 with Universal Restore EN Acronis TrueImage Home 2010 Build 6053 RU full & safe Acronis TrueImage Home 2010 Build 7046 EN full - Windows Recovery: Windows 7 Recovery Disk x64 Windows 7 Recovery Disk x86 Microsoft Emergency Repair Disk (ERD) Commander v6.5 x64 for Windows 7 / Server 2008 R2 Microsoft Emergency Repair Disk (ERD) Commander v6.5 x86 for Windows 7 / Server 2008 R2 Microsoft Emergency Repair Disk (ERD) Commander v6.0 for Windows Vista / Server 2008 Test Center: Micro-Scope Diagnostic Suite v14 Memtest86 4.0 Memtest86 2.11 Victoria 3.52s RU MHDD 4.6 HDD Regenerator: HDD Regenerator v1.71 HDD Regenerator v1.61 HDD Regenerator v1.51

Download here :
http://uploading.com/files/f58eadb4/MB_DVD_v11.0.part01.rar/
http://uploading.com/files/mb4114fb/MB_DVD_v11.0.part02.rar/
http://uploading.com/files/17fm6ec1/MB_DVD_v11.0.part03.rar/
http://uploading.com/files/a9b49ae2/MB_DVD_v11.0.part04.rar/
http://uploading.com/files/6c7452em/MB_DVD_v11.0.part05.rar/
http://uploading.com/files/6d2med1f/MB_DVD_v11.0.part06.rar/
http://uploading.com/files/8c6841b4/MB_DVD_v11.0.part07.rar/
http://uploading.com/files/m658fmda/MB_DVD_v11.0.part08.rar/
http://uploading.com/files/9aadff31/MB_DVD_v11.0.part09.rar/
http://uploading.com/files/d868eb44/MB_DVD_v11.0.part10.rar/
http://uploading.com/files/eb66ca6e/MB_DVD_v11.0.part11.rar/
http://uploading.com/files/d2m63633/MB_DVD_v11.0.part12.rar/
http://uploading.com/files/4b5734e4/MB_DVD_v11.0.part13.rar/
http://uploading.com/files/c999b3c4/MB_DVD_v11.0.part14.rar/
http://uploading.com/files/emc3945c/MB_DVD_v11.0.part15.rar/
http://uploading.com/files/6f29a379/MB_DVD_v11.0.part16.rar/
http://uploading.com/files/23782ce3/MB_DVD_v11.0.part17.rar/
http://uploading.com/files/598c6d78/MB_DVD_v11.0.part18.rar/
Related Posts with Thumbnails

Support

Software Blogs - BlogCatalog Blog Directory Online Marketing - OnToplist.com blog search directory blog directory blogarama - the blog directory Blog Directory & Search engine Computers Blogs My Zimbio